
Disclaimer – I am NOT a professional – I’m a hobbiest – I’ve only been embroidering since December of 2013 – I found there is so little out there to help us learn how to complete an embroidery project from beginning to end, I thought I’d try to take some photos of the steps that I do in hopes that it might help someone else in the learning process. This may not be the “right” way, but it works for me.
*****
![d39a7811b9c9ee5b26539e9da5af345a[1]](https://creationsbysuebella4u.wordpress.com/wp-content/uploads/2015/02/d39a7811b9c9ee5b26539e9da5af345a1.jpg) I start almost EVERY clothing item project by printing out my embroidery design. Here, I’m printing out the 3″ circle monogram I want to sew onto my t-shirt. This design includes a merged-in basting stitch as the first “stop.” I’ll give you more information about where to download a basting stitch file later in the tutorial.
I start almost EVERY clothing item project by printing out my embroidery design. Here, I’m printing out the 3″ circle monogram I want to sew onto my t-shirt. This design includes a merged-in basting stitch as the first “stop.” I’ll give you more information about where to download a basting stitch file later in the tutorial.
![98d24979597cd7f372bf77e5862d6f87[1]](https://creationsbysuebella4u.wordpress.com/wp-content/uploads/2015/02/98d24979597cd7f372bf77e5862d6f871.jpg?w=225&h=300)
The design prints out with vertical and horizontal centering lines as well as crosshair lines in the center – these are the important part of why you want to use a printed copy of your embroidery design for clothing (you’ll see why when I get to the hooping part of this tutorial)
![09d857bc47c2cccd086daaa79b3dcb9c[1]](https://creationsbysuebella4u.wordpress.com/wp-content/uploads/2015/02/09d857bc47c2cccd086daaa79b3dcb9c1.jpg)
Cut away the excess paper from around your design – make sure you don’t cut off the horizontal and vertical centering lines. Once you have the design cut out – spray the BACK of your printed paper design with temporary spray adhesive – I use Sulky KK2000.

Go a mirror and place the paper in the spot were you’d like your monogramming or design to be on your shirt. Once you have it in place, pin the top of the paper design to your shirt so it doesn’t come off when you take the shirt off.
![30d29858cd14e23e80f502cc48b0a1a1[1]](https://creationsbysuebella4u.wordpress.com/wp-content/uploads/2015/02/30d29858cd14e23e80f502cc48b0a1a11.jpg)
With the shirt laying on a flat surface center up your design so that it looks straight on your shirt (I just eye-ball this – I don’t usually remove the pin that I attached when I was doing the design placement in the mirror). Add additional straight pins so that you have a pin at the top and bottom and both sides of your design. I use flower-top heat-resistant straight pins that I ordered from Joann Fabrics and Crafts.
![151a4b3d62d9a7c5b097e6eace1df3bf[1]](https://creationsbysuebella4u.wordpress.com/wp-content/uploads/2015/02/151a4b3d62d9a7c5b097e6eace1df3bf1.jpg)
Next, turn your shirt inside-out. Here you can see where the design is based on the pin placement.
![7b4399ce9982b5054c7d6981996649ec[1]](https://creationsbysuebella4u.wordpress.com/wp-content/uploads/2015/02/7b4399ce9982b5054c7d6981996649ec1.jpg)
Place a piece of fusible poly mesh stabilizer on your shirt – center the stabilizer over the pins. I try to have at least a one inch border of excess stabilizer past my pin/design area on all sides. Iron down the poly mesh stabilizer (note – you have to use FUSIBLE poly mesh – the point of this is to stabilize the knit fabric so that it doesn’t move or stretch in the hooping or sewing process. Hooping sew-in poly mesh won’t work as well).
![07affd06d0b2b97e8657d9fee509a085[1]](https://creationsbysuebella4u.wordpress.com/wp-content/uploads/2015/02/07affd06d0b2b97e8657d9fee509a0851.jpg)
For hooping, I used my Monster Snap Hoop. Please note that it isn’t that important for your design to be completely in the center of the hoop (you can see mine isn’t). What is important is that the design is completely level with the hoop rulers vertically and horizontally. It’s also very important that you don’t stretch your fabric while centering the design in the hoop. Over stretching your fabric in the hoop will cause puckering.
![95486148e6e20ae768477a4468a3d246[1]](https://creationsbysuebella4u.wordpress.com/wp-content/uploads/2015/02/95486148e6e20ae768477a4468a3d2461.jpg)
To assure leveling horizontally I place a ruler along the printed lines on my printed design and make sure that the ruler falls at the same measurement on the left and the right side of the hoop (again, it doesn’t have to be at zero or perfectly in the center).
![6c8767cdb32eec40dac404aba335556a[1]](https://creationsbysuebella4u.wordpress.com/wp-content/uploads/2015/02/6c8767cdb32eec40dac404aba335556a1.jpg)
I do this same ruler-centering process for the vertical leveling. You can see that my design falls about an eighth of an inch past the center to the right at both the top and the bottom – it’s NOT important to be at zero – it’s important that the leveling lines on your design fall at the same measurement at the top and bottom.

For a little extra stability during the sew out I’m going to take a 10×12 sheet of tear away stabilizer and fold it in half to use under my hoop. I’m specifically choosing NOT to use cut away here because the shirt fabric weight is very light and cut-away will give the sew-out bulk which will show through the shirt when it’s done – I don’t want that.
![6b5b86dcb8afe686f828f6e631968b94[1]](https://creationsbysuebella4u.wordpress.com/wp-content/uploads/2015/02/6b5b86dcb8afe686f828f6e631968b941.jpg)
I don’t hoop the tear-away stabilizer, I just push it under the hoop after I’ve attached the Monster Snap Hoop to my embroidery machine.

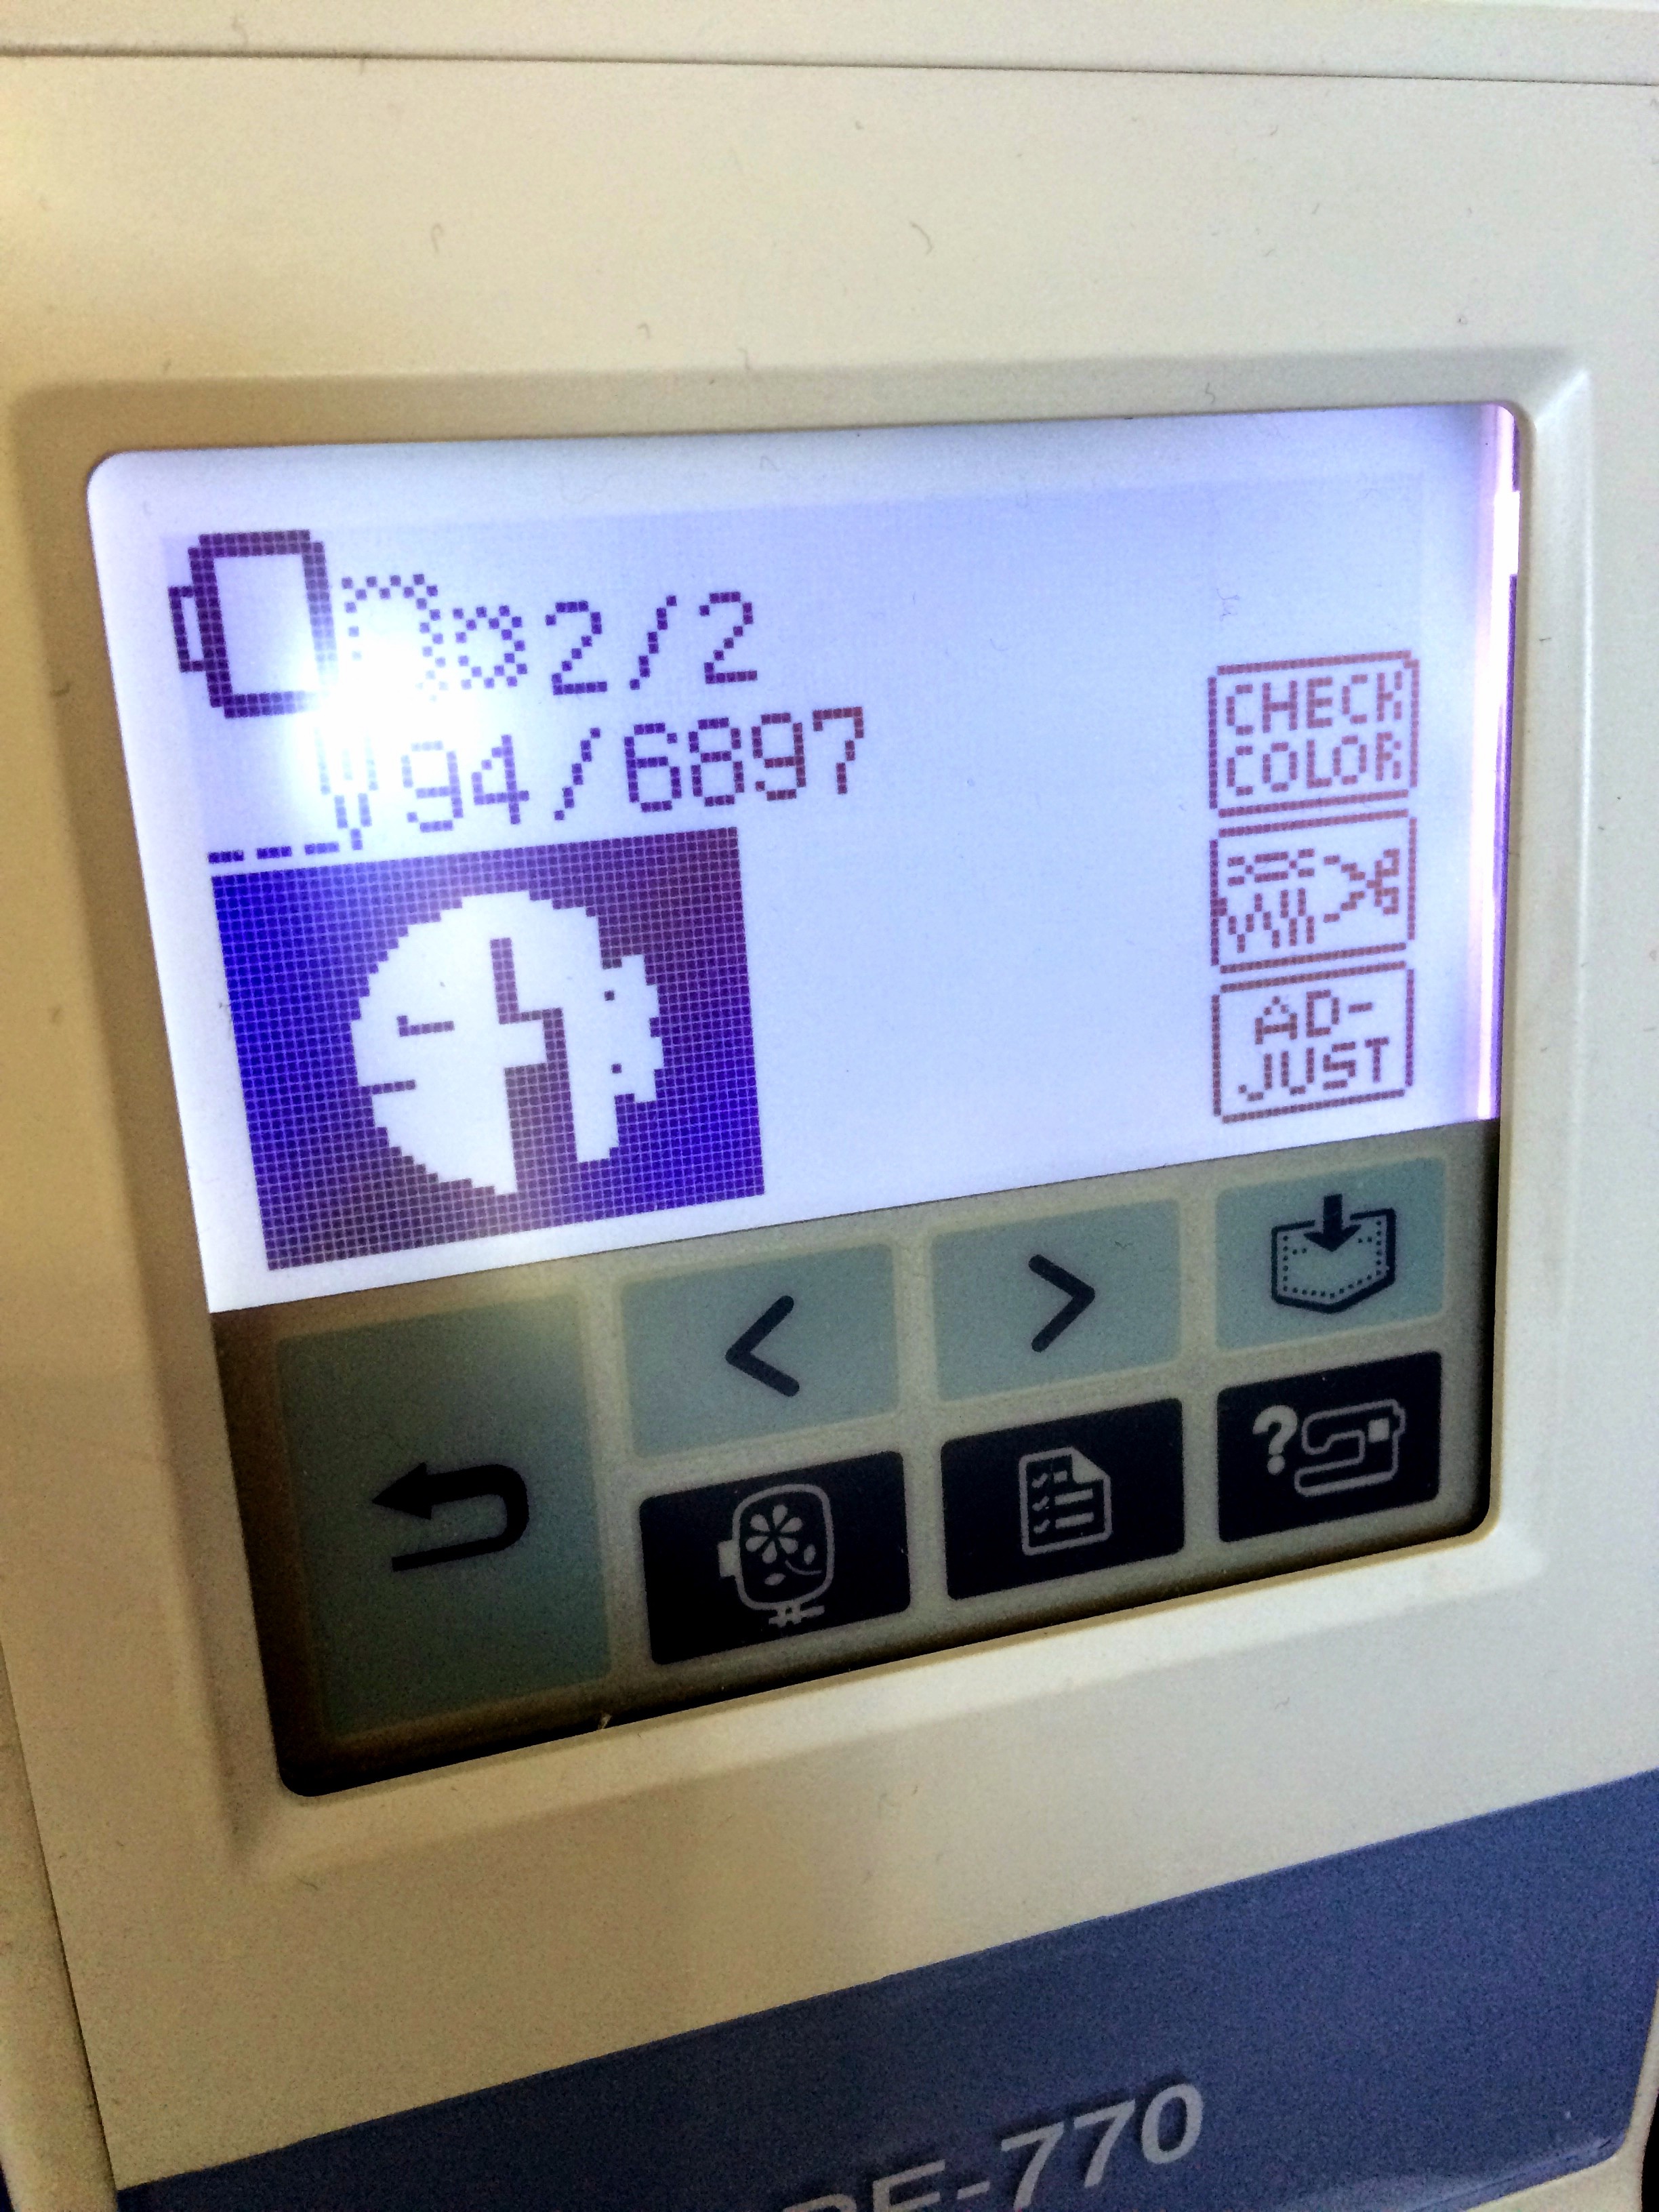
This is the control panel on my Brother PE-770 embroidery machine. I have already saved the design I want to sew-out from my computer to my flash drive. I’ve plugged my flash drive into the side of my machine. By touching this icon, I’m telling the machine I want to sew a design that is located on my flash drive. If you have a different machine, your control panel will likely look different, but there will be options to do the same steps – they may just look different.

Next I need to tell my machine WHICH design on my flash drive I want to sew. Scroll left or right until you see the design you want to sew out on the screen. Touch the design you want to sew.

Next you have to send the design from the flash drive to the machine – touch the “upload” icon to send your selected design to the machine.

The hoop will do some shifting around, and will likely land in a place that isn’t at the center of your design. HERE is reason the printed design with the crosshairs in the center becomes so important. You need to tell the machine where the center of your design is. You can see that my design falls left and a little lower than center in this photo.

To tell the machine where the center of your design is, choose “ADJUST” on the control panel.

Then choose “LAY-OUT”
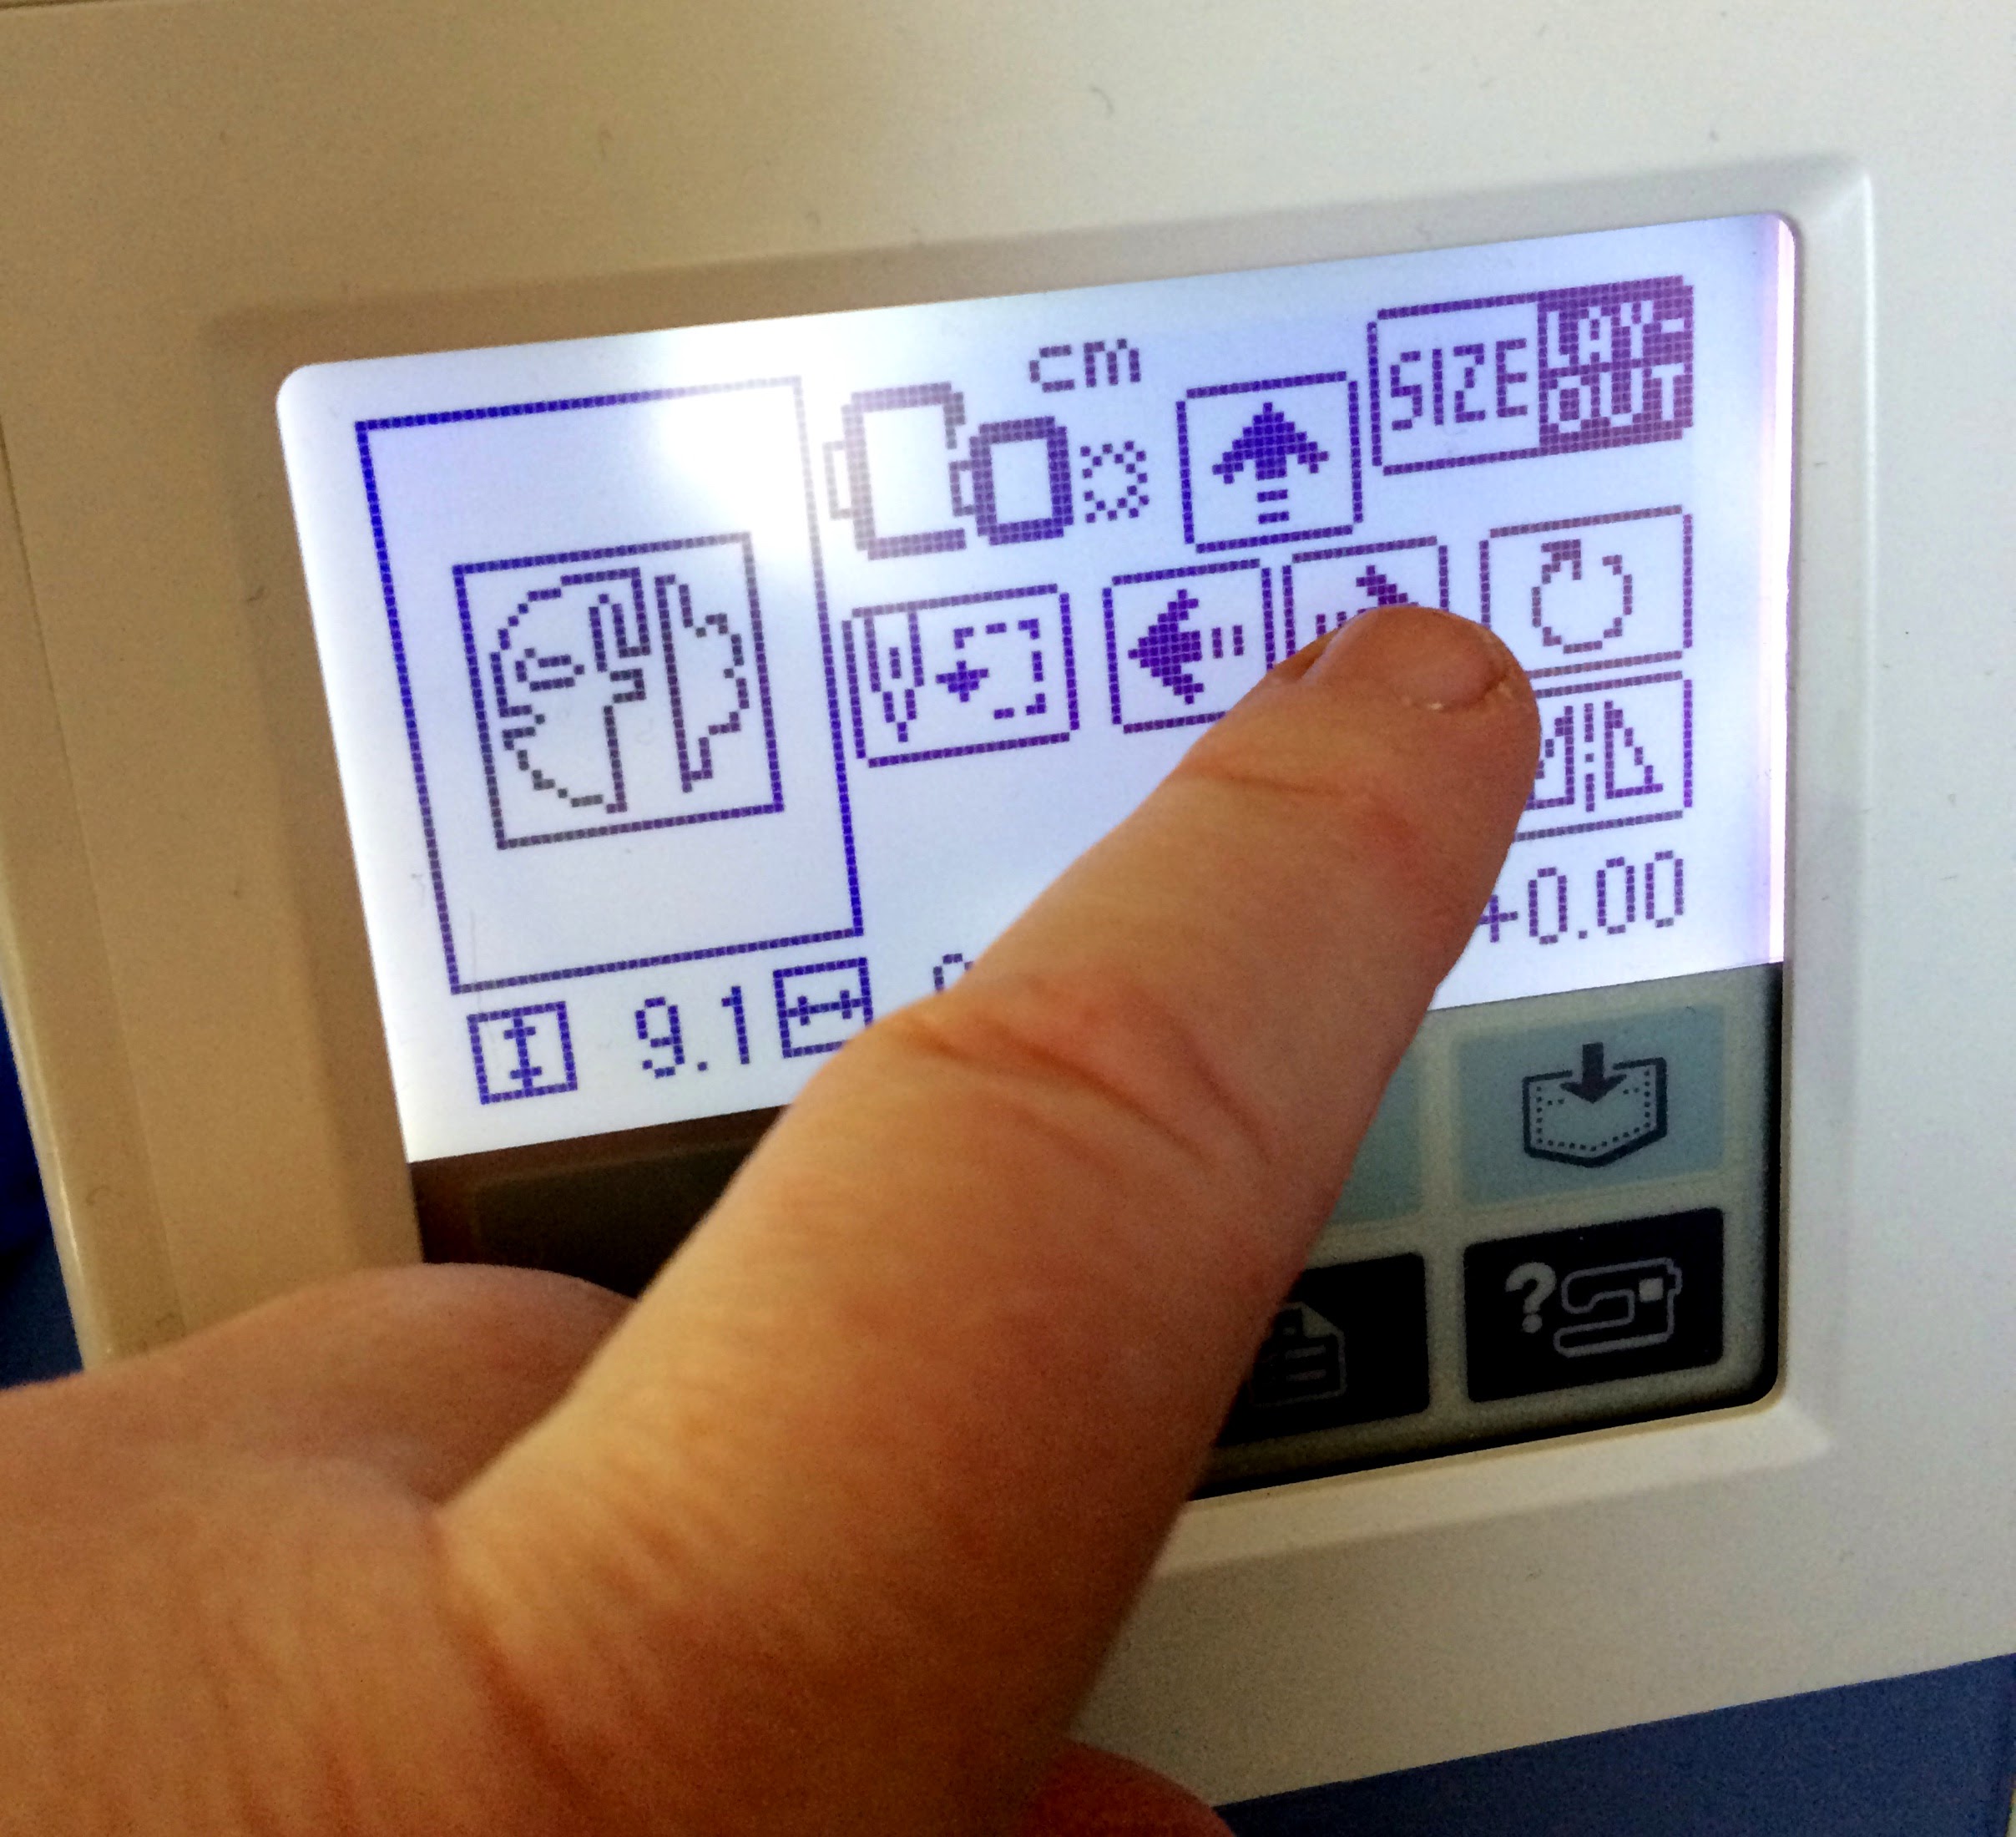
Touch the arrows to move your hoop left or right and up or down to get your needle to fall exactly in the center of those crosshairs on your printed design.

See how the crosshair centerpoint falls exactly in the center of my needle hole (I’m sure it’s really called something other than a “hole,” but you know what I mean)… THIS is what you want the centering to look like before you begin sewing.

You don’t have to do this step if you don’t want to – I like to use it – I think Heat Away gives me a much cleaner sew-out, but it is optional if you just don’t want to use a “topper.”
![892b3fcddc004bea641ef10763e9036d[1]](https://creationsbysuebella4u.wordpress.com/wp-content/uploads/2015/02/892b3fcddc004bea641ef10763e9036d1.jpg)
I’ve removed the paper copy of my design now that I’ve centered my needle with the cross-hairs (I don’t move the hoop to remove the paper design – just take the pins out carefully – be sure not to move the fabric or the hoop while you are unpinning the paper) . Once I have my Heat Away layer in place, it’s time to push “GO!!”

I almost always use a basting stitch (unless it would make holes in my project that would be seen later – like leather purses or some canvas tote bags). I use a basting stitch file that I merge into my design as the first “stop.” I got my basting stitch files from Embroidery Garden and they were FREE! You can get those here: http://www.embroiderygarden.com/shop/free-designs-projects/basting-files-basj65.html
After the basting stitch sews out, the machine will likely stop and wait for you to tell it that you are now ready to begin sewing your design. You might have more than two “stops” if you have several colors in your design.
![c4d9b9a16c26aac742cb8b912de379c6[1]](https://creationsbysuebella4u.wordpress.com/wp-content/uploads/2015/02/c4d9b9a16c26aac742cb8b912de379c61.jpg)
I like to stop my machine to cut the “jump threads” between each monogram letter. You don’t have to do this, but the OCD in me tells me to do it! 🙂
![9c0d7e8a89a28a013d438dc630adefcd[1]](https://creationsbysuebella4u.wordpress.com/wp-content/uploads/2015/02/9c0d7e8a89a28a013d438dc630adefcd1.jpg)
![1d6ade7d96e7eabefc17221271e35b1d[1]](https://creationsbysuebella4u.wordpress.com/wp-content/uploads/2015/02/1d6ade7d96e7eabefc17221271e35b1d1.jpg)
![605b974b92ec3dc55d24c62c55dd6fc3[1]](https://creationsbysuebella4u.wordpress.com/wp-content/uploads/2015/02/605b974b92ec3dc55d24c62c55dd6fc31.jpg)


This is great, Susan! Thanks so much for your fantastic tutorials! They’re a huge help to a beginner like me. 🙂
LikeLike
I hope you’ll post the pictures of your finished projects, Joy! I can’t wait to see them! I’m sure they will be as awesome as everything else you make!
LikeLike
This is another project I will try! It’s beautiful and I absolutely LOVE the look on your shirt!
LikeLike
Sue, your tutorial totally changed my life. I didn’t think I would ever be able to center my embroidery items. Fast forward to now and I’m stuck again. Do you have any suggestions on how to center items when using the Brother multiposition hoop for PE770? I am really struggling. Thanks so much!
LikeLike
Hi Stephanie! How nice to know that my tutorials have helped you! I’m not sure why Brother hasn’t come out with more instructional videos. Anyway… I HAVE the multi-position hoop, but I’ve never used it! 🙂 I have a friend that is REALLY good at embroidery and she uses a PE770 also. Let me ask her about the centering issue with the large hoop. I’ll let you know what she says.
LikeLike
I thank you very much, because you share the experience, I started off with machine embroidery
LikeLiked by 1 person
Thanks for the great information!
LikeLike
You are very welcome, Janet! I hope it was able to help you understand the machine embroidery process a little better. Have a wonderful Thanksgiving!
LikeLike
Unfortunately you can’t, Janet. The jump thread auto-cutting feature is only available on more expensive models. I just upgraded to a used Quattro 2 (bought it on eBay) – it has the auto-cutting feature and it definitely a fantastic thing to have!
LikeLike
Great tutorial. I love the font you chose too.
LikeLiked by 1 person
Can you tell me what this design is called and where you got it? I love the quilted look of the letters!
LikeLike
https://creativeappliques.com/shop/natural-circle-honeycomb-monogram-embroidery-alphabet-font/
LikeLike
How do you merge the basting stitch in with the design?
LikeLike
What software do you use, Pam? I have Embrilliance now and I just select “Baste Design” that’s located in the “Utilities” menu.
LikeLike
I have just gotten a Brother PE 770, and like you said, it’s hard to learn how to use it. I don’t even know what you mean about software. I think I know that I can buy designs and download them to the flash drive and load them to the machine. But, do I have to have some other software?
LikeLike
I’d recommend software. If you don’t have software you won’t have the ability to combine designs with text. Without software you really only have the capability to sew out designs just as you buy them – you can’t customize at all.
LikeLike
This is a fabulous tutorial. Thank you! I have not tried monogramming yet but hope to soon. I have a Brother PE 770 and have trouble with the embroidering having slight places where there isn’t any thread. Hope that makes sense. On tshirts I use a fusible mesh on the back of the fabric and then I float another no show mesh under the hoop. Should I use a water solvable stabilizer on top, too? Would appreciate your help. Thank you 🙂
LikeLike
Hi Rebecca! I use the fusible poly mesh, float on tearaway and use heat away on top. The sparse stitching could be a digitizing issue… where did you buy your design? I tend to be very particular on where I buy designs because some businesses digitize much better than others. The other thing it could be is the fabric you are sewing on. Is it thin T-shirt fabric or a woven cotton? Woven materials always tend to separate the threads during sew out.
LikeLike
I purchased the design from RosiedayEmbroidery on Etsy. I believe the fabric is 100% cotton, purchased from Christopher and Banks. The quality is pretty good : ) Will definitely add a heat away on top. Can I place my appliqué fabrics right on top of the heat away? Really appreciate your help. I don’t have anyone in person to go to for help. Would you be willing to recommend some of your favorite go to appliqué shops?
LikeLike
Happy to help, Rebecca. When I use Heat Away for appliqué I sew the placement stitch then cut out the Heat Away from inside the placement stitch. Most experienced embroiderers will tell you it is pretty risky to buy designs from Etsy, although I have had good success with several I have purchased personally from Etsy. I have a Pinterest board where I have pinned the places I like to buy embroidery and appliqué designs from. http://pin.it/927k6mM. Let me know if I can be of any further assistance to you.
LikeLike
Sorry, I forgot to ask if you have any more embroidery tutorials : )
LikeLike
I haven’t done a tutorial in a very long time. I need to start doing them again. I work full-time and just finished my masters degree sew in the evenings and on weekends. I don’t have my PE 770 anymore. I upgraded to a Brother Quattro 2 (larger hoop size and display screen). Is there anything particular you would like me to demo?
LikeLike
This is so great. Thank you for your effort and all the details in this tutorial!
LikeLike
Me and my friend own a PE 770, and it looks like we’re having trouble with tension, all our designs look as if they’re too tight within the fabric. Do you have a personal email because I have tons of more questions, maybe you can ask your friend who also uses the PE770.
LikeLike
Suebella4u@hotmail.com
LikeLike
Also, what software do you use for your designs and what stabilizer do you use for tshirts to make sure the design comes out well.
LikeLike
Embrilliance software. The stabilizers are different depending on the project. And each blog post I identify which stabilizer I’m using.
LikeLike
What stabilizer do you recommend for tshirts and what are your tension settings for doing t-shirts
LikeLike
I never ever change my tension. The secret to embroidery on T-shirts is using fusible polymesh stabilizer on the backside of your design. I hoop tearaway and float the design.
LikeLike
Can you please mentor us?
LikeLike
Where do you live?
LikeLike
Dekalb Illinois
LikeLike
Yeah, I live in SC… a bit far to get together. Maybe we can Skype sometime.
LikeLike
Here’s a link to my Pinterest board of things I’ve made:
http://pin.it/OuKSaj7
LikeLike
How do you do applique and are you aware of the terms height and width in regards to stitching a satin stitch?
LikeLike
I learned by watching YouTube videos: Check out this video on YouTube:
LikeLike